How To Make Wax Seals With Dried Flowers
Find everything you need to know about how to make wax seals with dried flowers, providing clear instructions and where to find wax seal stamp supplies to craft DIY wax seals.
Have you noticed wax seals making a comeback? My social media feeds are flooded with dreamy videos of colorful wax delicately poured and sealed with detailed stamps. Watching that wax transform into a beautiful, glossy seal has me transfixed.
Needless to say, the return of wax seals has caught my attention, and I’m not alone in my fascination. These captivating creations are reclaiming their place as a symbol of elegance, craftsmanship, and a touch of old-world charm.
There’s no denying wax seals elevate everything they touch. Personalized stationery for heartfelt letters and invitations to gift wrap, packaging, and decor; wax seals add a touch of refinement.
Yet, their beauty lies in their simplicity.
Creating wax seals doesn’t require much, and the tools are completely reusable. In this article, I’ll cover what you need to get started – where to find supplies locally or online to craft your own mesmerizing wax seals.
Then, I’ll guide you through everything you need to know about how to make wax seals, providing clear instructions.
For your convenience, this post contains some affiliate links; read the full disclosure policy.

What Are Wax Seals Made Of?
Have you wondered about what makes a wax seal? What are the ingredients in wax seals?
Traditionally, wax seals were crafted from a mixture of things to create a malleable and durable substance. These included various proportions of shellac, beeswax, turpentine, resin, chalk, or plaster. Coloring was often provided by vermilion or red lead.
Coarse grades of these materials were used to seal wine bottles and fruit preserves, while fine grades were used to seal documents and letters.
In the past, wax sealing could be a messy, inconsistent process. Today, while the art of wax sealing remains as captivating as ever, the ingredients have evolved to offer more clean, reliable options.
Modern wax seals are commonly made of nontoxic beeswax and refined resin, a blend that provides an ideal consistency for creating sharp, detailed impressions.
Can You Use Candle Wax To Make A Wax Seal?
I’ve been asked if you can use candle wax to make wax seals. Common soy candle wax will make a mess because it’s too thin and takes too long to harden.
Beeswax can be used to make a wax seal, but it is missing the resin that sealing wax has. So, a wax seal made with beeswax wax will crumble and break easily.
Wax seal beads are easy to use and harden quickly, forming a strong bond that’s clean to the touch.
And that’s exactly what I use and recommend for making wax seals.

What Do You Need To Make Wax Seals?
If you’re a DIYer like me, I know you’ll also appreciate that it doesn’t require a dozen supplies to make wax seals. Happily, the tools we do need are reusable and small in size. (I store my wax seal supplies in the same basket with my papermaking tools.)
Here’s a list of what I use to create homemade wax seals and where to find each supply locally or online –
Wax Seal Stamps:
The stamps used to imprint designs on the wax are the easiest way to give your DIY wax seal personality! This set of floral wax seal stamps has a lot of pretty options, and I adore this birth flower series on Etsy. Hobby Lobby carries a small collection of wax seal stamps locally.
You’ll also need a wax seal stamp handle to use the stamps correctly and get a crisp impression. The one I used in the photos came from Hobby Lobby; it looks identical to this handle. You can also find handles in many colors, shapes, and stone styles.
Sealing Wax Beads:
Modern wax seal beads melt quickly and evenly for smooth seals. They come in various colors, including traditional shades like red wine and gold, as well as delicate pastel hues. Locally, you can find sealing wax beads at Micheals. I used pearl white beads to highlight the dried flowers in my seals.
Wax Seal Stove:
You’ll need a heat source to melt wax beads. A wax seal stove, also known as a wax seal furnace, is a great tool for this. I purchased mine at my local Hobby Lobby. I have my eye on this gorgeous brass wax seal stove.
Most come with a wax melting spoon to melt sealing wax evenly, designed with a spout for controlled pouring. You’ll also need a candle to place in the wax seal stove to melt the wax. (I make my own candles with natural soy wax and smoke-less cotton wicks that work perfectly for wax seal stoves, wax melt warmers, and essential oil burners!)
Outside of these three essential supplies needed to make wax seals, I prefer a marble coaster for a faster setting or a silicone wax seal mat for uniquely shaped seals. I also like to cover my surface with a non-stick mat in case of a spill.
Related To: DIY Beeswax Candle Tapers With Gold Wax Seals
How Do You Make A Flower Wax Seal?
I’m an avid gardener and enjoy foraging wildflowers. So, I often have flowers and herbs to spare. So, I couldn’t resist adding flowers to wax seals.
Can you use fresh flowers in a wax seal? Yes, you can use fresh flower petals in a wax seal, but they will eventually dry and may turn brown.
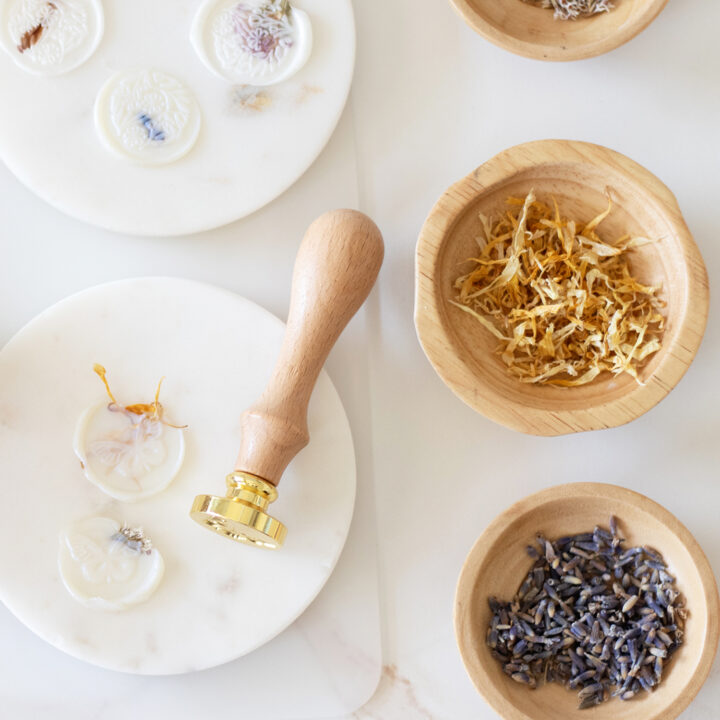
That’s why I like to start with dried flowers and herbs that have retained their color, such as purple lavender buds, yellow calendula petals, and pink static flowers.
Each creates an eye-catching, delicate feature to this timeless craft.

How To Make Wax Seals: Step-By-Step
So, how do you make homemade wax seals? Follow my clear, step-by-step instructions to make wax seals with dried flowers and whimsical designs.
Every seal tells a story.
Dried Flower Wax Seal Supplies:
Dried Flowers + Herbs
Tea Light Candle
Ice Cubes
Step 1: Chill Your Wax Stamp
Screw your wax stamp into the stamp handle. Then, dip the metal end of the stamp into a tiny bowl of ice water. Allow it to chill in the ice bath, then blot it on a microfiber towel. Place the stamp on a marble coaster to keep it cold.
Step 2: Melt The Wax
While your stamp is chilling, begin melting the wax. Place a tea light candle (I make my own) inside a wax seal furnace and light the wick. Place 2 to 3 pearl wax beads in the melting spoon for one wax seal.
Step 3: Pour The Wax And Stamp
Once the wax has melted, pour the wax onto the marble board or coaster in a circular pattern. (Don’t worry if it’s messy.) Sprinkle dried flower petals or buds into the wax. Then, stamp the seal into the center of the wax.
Step 4: Reveal The Seal
Wait 15 to 30 seconds for the wax to cool, then give the stamp a gentle pull. If the wax moves, let it cool longer. But if it feels stiff, wiggle the handle and pull the stamp off to reveal the seal!
How To Make Wax Seals With Dried Flowers
Materials
- Dried Flowers + Herbs
- White Pearl Sealing Wax Beads
- Ice Cubes
Tools
- Wax Seal Stamps
- Wax Seal Stamp Handle
- Tea Light Candle
- Wax Seal Furnace
- Wax Melting Spoon
- Marble Coaster
Instructions
- Chill Your Wax Stamp - Screw your wax stamp into the stamp handle. Then, dip the metal end of the stamp into a tiny bowl of ice water. Allow it to chill in the ice bath, then blot it on a microfiber towel. Place the stamp on a marble coaster to keep it cold.
- Melt The Wax - While your stamp is chilling, begin melting the wax. Place a tea light candle (I make my own) inside a wax seal furnace and light the wick. Place 2 to 3 pearl wax beads in the melting spoon for one wax seal.
- Pour The Wax And Stamp - Once the wax has melted, pour the wax onto the marble board or coaster in a circular pattern. (Don’t worry if it’s messy.) Sprinkle dried flower petals or buds into the wax. Then, stamp the seal into the center of the wax.
- Reveal The Seal - Wait 15 to 30 seconds for the wax to cool, then give the stamp a gentle pull.
Notes
If the wax moves, let it cool longer. But if it feels stiff, wiggle the handle and pull the stamp off to reveal the seal!
Recommended Products
As an Amazon Associate and member of other affiliate programs, I earn from qualifying purchases.


Follow these steps to create wax seals adorned with dried flowers to add a dash of elegance to your crafts. These charming creations are perfect for personalizing your world, from sealing letters to embellishing gifts, candles, and decor.
YOU MAY ALSO LIKE:
- Flodesk Studio: First Look
- Wood Cutting Board Care
- Sun-Soaked Garden Beeswax Candles
- Lemon Cedar Dust Spray and Polish
- Lemon Poppy Seed Melt and Pour Soap Recipe

Save this tutorial for how to make wax seals with dried flowers to your DIY crafts Pinterest board, and while you’re there, be sure to follow Life-n-Reflection for more inspiring ideas.
Did you know you can Tag #lifenreflection on Instagram to share yours with me?