Coffee DIY Wax Melts Recipe – But FIRST COFFEE!
Here’s an easy coffee DIY wax melts recipe. Homemade wax melts are super simple to make for your candle warmer. You’ll never need to buy them again!
I may have said it before, but coffee is by far one of the most supreme aromas you’ll ever smell. And quite possibly one of the best discoveries by humankind. Right?
Don’t get me wrong; I enjoy my fair share of dark chocolate and red wine. But, one whiff from a bag of whole roasted coffee beans and I turn to butter.
So, it’s no surprise that I love finding ways to enjoy the complex aroma unique to coffee. Take, for example, my easy coffee soap recipe made with brewed coffee grounds or relaxing crackling wood wick candles blended with roasted coffee beans.
But it doesn’t stop there; I enjoy giving my skin a invigorating treatment with my coffee body scrub. And who can resist making an enamel coffee mug candle? Not I.
Well, melting these coffee DIY wax melts in my candle warmer is just as good and inviting as the scent of brewing coffee.
This post contains some affiliate links. Thank you for your support. Check out the full disclosure policy for more details.

This is where I shout, “Coffee lovers, UNITE!”
If the scent of roasted coffee beans or a freshly brewed cup draws you in, too, then your senses will be delighted with this DIY wax melts recipe.
Made with coffee essential oil and whole roasted coffee beans – you’ll be able to enjoy the aroma any time of day!
That’s right; when you read a book in the evening or watch Netflix, you can enjoy coffee without worrying about staying up too late.
And if you’re new to candle making, have no fear; homemade wax melts are super simple to make for your candle warmer with this easy coffee DIY wax melts recipe!
Related To: Beginner Guide to Candle Making
How Do You Make Homemade Wax Melts?
After choosing your candle wax, the next step is to select a wax melt mold. I have used silicone molds designed for chocolate making several times with success. They are typically less than a $10 investment, and you can use them repeatedly!
For example, this silicone mold allows you to make up 24 wax melts at a time. But I know figuring out how much wax you need to make candle wax melts can be tricky.
Here are the steps I take to figure out how much wax I need for a silicone mold:
- Carefully fill each cavity of the silicone mold with water, avoiding overflow into other cavities.
- Pour all the water into a liquid measuring cup.
- Note the ounces and double it for the volume of wax for your recipe.
This certainly isn’t an exact science, but it does the trick when working with silicone molds. To measure wax more accurately, check out our candle wax calculator.
For this candle wax melts recipe, I used this silicone mold that holds space to make 40 wax melts. I filled each cavity half full to make the correct size .25 ounces for a wax warmer.
Did I mention silicone molds are incredibly easy to work with? All you do is pop out each wax melt, then wipe it clean with a kitchen towel to use again.
Everyone is asking how do you make wax melts smell stronger.
You can fill your home with rich, strong aromas with just the right amount of scent in your wax melts.
And you can do it for less with cleaner ingredients than typical store-bought wax melts.
Unlike conventional candle melts you see in the store, essential oils and natural fragrances are my go-to when it comes to my home. And I’ve learned a few valuable tips on getting a strong scent throw for candles without relying on synthetic fragrances. You can apply these to make wax melts smell stronger, too!
Related To: How to Make Scented Candles

What Is The Best Wax To Use For Wax Melts?
Natural soy wax is the easiest candle wax type to make wax melts with. It burns cleaner than paraffin wax and cleans up with water. (If you’ve ever had a candle warmer get knocked over, you know how amazing that is.)
Soy wax is also less expensive than other natural choices like coconut or palm wax. However, I’ve made candle melts with beeswax, and they are quite beautiful – see for yourself with my herbal beeswax candle melt recipe.
If you need help choosing candle wax, check out my candle wax guide, covering the pros and cons of each type.

DIY Coffee Wax Melts Recipe
Ready to give it a try? Jump into my step-by-step tutorial to make inviting homemade coffee candle melts with a fresh brewed aroma. Here’s what you’ll need –
Wax Melt Supplies:

8 ounces soy candle wax
1 teaspoon coffee essential oil
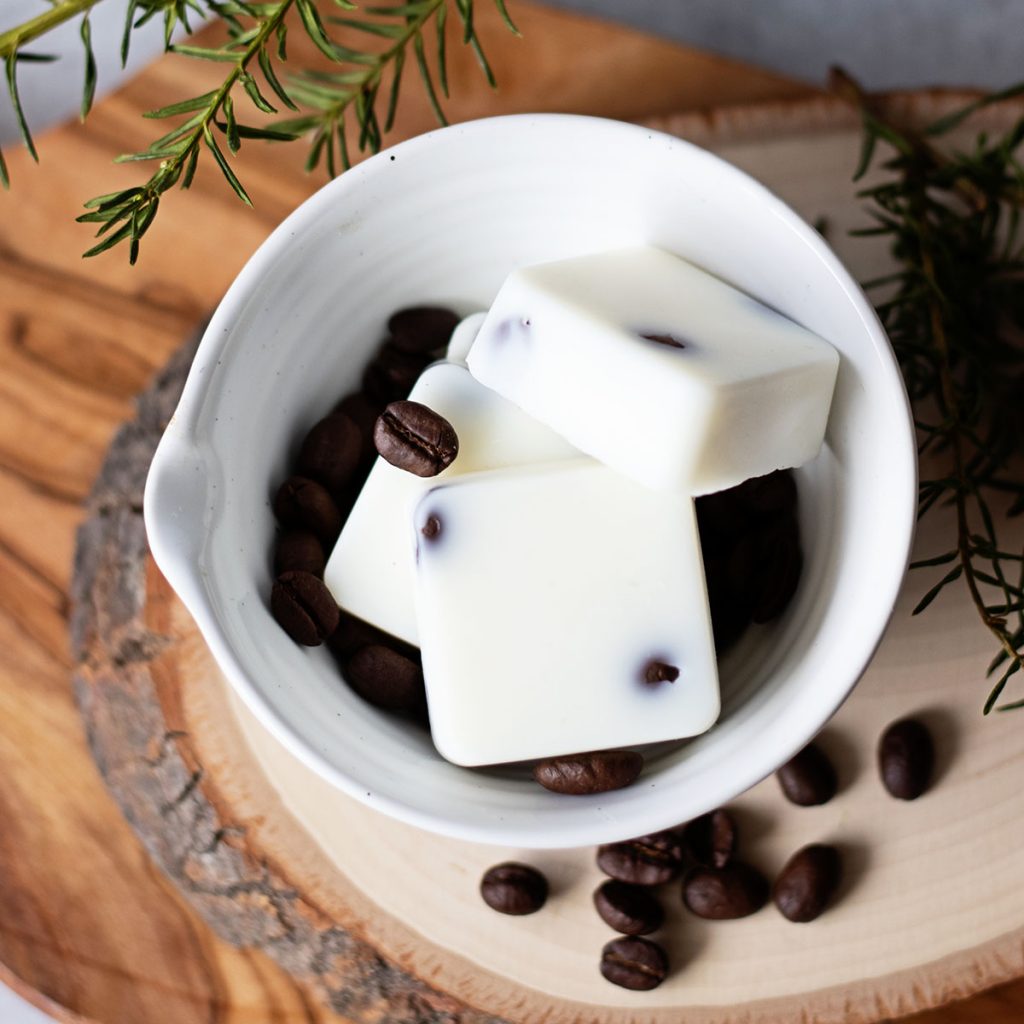
1 teaspoon whole coffee beans

DIY Wax Melt Instructions:
This recipe makes 18 to 24 wax melts depending on two things:
- How full each section of the silicone mold is filled
- How many coffee beans are added
1. Prep and Measure: Before you begin, line your work area with parchment paper for easy cleanup. Clean and towel dry the silicone mold and place it on a tray like a cookie sheet for support and ease of use.
Spread one teaspoon of whole coffee beans between 18 to 24 sections of the mold and set aside. Then, use a kitchen scale to measure 8 ounces of soy wax flakes.
2. Melt: To safely melt the wax, pour it into a candle melting pitcher. Then, place the pitcher inside a large saucepan filled with 2 inches of water. Heat on medium to low heat with a gentle simmer at most, using the double boiler method. Stir often with a heat-resistant silicone whisk.
3. Cool & Scent: Remove the pitcher from the heat immediately after melting. Use a no-touch infrared thermometer to watch the wax cool from 150°F to 145°F. Once cooled, add 1 teaspoon of coffee essential oil and stir constantly for 1 to 2 minutes to incorporate thoroughly.
4. Pour: After adding the scent, carefully pour the wax into the silicone mold. I filled 24 sections half full with wax. Using a different silicone mold? Follow the steps above to find the right amount of candle wax for yours.
Allow the candle melts to cure for 24 hours, then pop them out of the mold, and they are ready to use.
How long do wax melts last?
These DIY wax melts made of soy wax will last between 8 to 10 hours for each wax melt. Concerning how to use candle melts best, place one wax melt in a candle warmer and warm it until the fragrance is released into the room. Then turn the warmer off and let the wax melt cool again before melting.
You can repeat this process many times over the course of weeks until the amount of scent is largely dissipated before moving on to the next wax melt.
How? Because it typically only takes 30 minutes to melt and fragrance a room. This method is very practical and greatly extends the use of each wax melt compared to leaving a candle warmer on all day.
Printable Recipe Anyone?

Coffee DIY Wax Melts
Homemade wax melts are super simple to make for your candle warmer with this easy coffee DIY wax melts recipe!
Materials
- 8 ounces soy candle wax
- 1 teaspoon coffee essential oil
- 1 teaspoon whole coffee beans
Tools
- 1 digital kitchen scale
- 1 candle thermometer
- 1 mini square silicone mold
- 1 candle melting pitcher
Instructions
- Prep and Measure: Before you begin, line your work area with parchment paper for easy cleanup. Clean and towel dry the silicone mold and place it on a tray like a cookie sheet for support and ease of use.
- Spread one teaspoon of whole coffee beans between 18 to 24 sections of the mold and set aside. Then, use a kitchen scale to measure 8 ounces of soy wax flakes.
- Melt: To safely melt the wax, pour it into a candle melting pitcher. Then, place the pitcher inside a large saucepan filled with 2 inches of water. Heat on medium to low heat with a gentle simmer at most, using the double boiler method. Stir often with a heat-resistant silicone whisk.
- Cool & Scent: Remove the pitcher from the heat immediately after melting. Use a no-touch infrared thermometer to watch the wax cool from 150°F to 145°F. Once cooled, add 1 teaspoon of coffee essential oil and stir constantly for 1 to 2 minutes to incorporate thoroughly.
- Pour: After adding the scent, carefully pour the wax into the silicone mold. I filled 24 sections half full with wax. Using a different silicone mold? Follow the steps above to find the right amount of candle wax for yours.
- Allow the candle melts to cure for 24 hours, then pop them out of the mold, and they are ready to use.
Notes
To use place one wax melt in a candle warmer and warm it until the fragrance is released into the room. Then turn the warmer off and let the wax melt cool again before melting.
You can repeat this process many times over the course of weeks until the amount of scent is largely dissipated before moving on to the next wax melt.
Recommended Products
As an Amazon Associate and member of other affiliate programs, I earn from qualifying purchases.


YOU MAY ALSO LIKE:
- Wood Cutting Board Care
- Sun-Soaked Garden Beeswax Candles
- Lemon Cedar Dust Spray and Polish
- Lemon Poppy Seed Melt and Pour Soap Recipe
- DIY Gardeners Hand Scrub Recipe
Coffee lover or not, every home should have a candle or two that makes it feel comforting. And wax melts are the easiest way to do just that! Pin these quick steps to making coffee DIY wax melts now—and tag #lifenreflection on Instagram to share yours with us.