Is Your Candle Wick Size Right?
Here are five signs your candle wick size is not the right size and how to choose the correct wick if it’s not with a printable candle wick size chart for each candle wick type!
I think it’s fair to say what first to comes to mind to a make candle is choosing a candle wax type. This is undoubtedly a necessary step in order to make a candle, but I’ve found the choice of a wick is even more important.
Why does candle wick size matter? Making candles with the wrong wick size will always result in a candle problem. In fact, an incorrect candle wick size can cause a host of candle issues!
I can tell from experience; that there’s nothing more frustrating than nailing your candle fragrance load and pouring smooth tops, only to end up with a candle that won’t stay lit!
Choosing the right candle wick size for homemade candles can be as confusing for experienced candle makers as beginners. Oftentimes because as candle makers, we make new candles in various containers, shapes, and sizes.
For example, you will need a different wick size for tea light candles than sugar mold candles or mason jar candles. So, as they say, we’re constantly coming back to the drawing board to choose a candle wick.
If that is where you find yourself today, you’ll be glad to know the five signs your candle wick size is incorrect. And three quick steps to choosing the proper wick using printable candle wick size charts.
For your convenience, this post contains some affiliate links; read the full disclosure policy.
Related To: How to Make a Candle Last Longer

How do you know if you are using the wrong candle wick size?
It’s a fact; that candles will not burn the way you expect them to unless you have the right candle wick size. But, how do you know if you are using the wrong candle wick size? Here are five signs your wick isn’t the correct size and how to remedy it!
5 Signs Your Wick Isn’t The Right Size
1. FLICKERING FLAME
A flickering flame is a sign your wick isn’t the right size (other than a crackling wood wick designed to flicker).
- The most common issue is a wick that is too long. Use a wicker trimmer to trim the wick to 1/4 inch and relight the candle.
- If this doesn’t fix the issue, that could indicate that the candle wick is too thick and melting more wax than the wick can burn.
2. CANDLE TUNNELING
We are familiar with candle tunneling. But do you know the reason it happens and how to fix it?
- When a candle is lit for a short period of time and doesn’t form a complete melting pool, it will always tunnel. To remedy, burn candles long enough for the wax to melt entirely across the candle’s surface – from edge to edge.
- If tunneling persists after trying the above, it’s a fair sign the candle wick is too thin. And that means you need to size up your candle wick to a thicker width, so it has enough strength to create a complete melting pool.

3. WICK WON’T STAY LIT
When a candle wick doesn’t stay lit, you’re facing one of two problems:
- In many cases, this is a sign the candle has too much fragrance. Use a fragrance load calculator to avoid adding too much.
- A wick that self extinguishes can also be caused by a candle wick that is too thin or short for the container or candle size. A good reminder is to always measure your candle container or candle mold before choosing a wick.
4. DROWNING CANDLE WICK
Also known as a deep melt pool, a drowning candle wick is a big sign you’ve got the wrong wick size!
- A wick that is much too thick for the diameter of a candle will cause a melt pool deeper than half an inch. This will significantly shorten the candle’s life because it’s burning up wax too fast.
5. MUSHROOMING WICK
A mushrooming wick earned its namesake for a wick having the appearance of a mushroom when it splits as it burns. It’s a very common issue; in most cases, there’s an easy solution.
- You risk mushrooming every time you light a candle without trimming the wick to ¼ inch. You see, when a wick is too long, the wax in the candle often isn’t capable of burning fast enough to keep up with the wick, so the wick splits.
- Mushrooming can also appear when a wick has formed buildup from not being trimmed adequately between use. That’s why using a wicker trimmer is number two on my candle care tips.
- If the wick mushrooms again after trimming correctly, the wick is possibly slightly too thick.
As you can see now, candle wick size ALWAYS MATTERS!
If you are experiencing any of these signs, read the following three simple steps to choosing the correct candle wick. And see the printable candle wick size charts below to find the correct wick size for the diameter of your candle container.

How Do You Choose the Right Candle Wick Size?
Do the signs above sound all too familiar? Then it’s time to ask, “How do I choose the right wick?” When planning your candle projects, use these three steps to choose the proper candle wick as a checklist.
1st: Candle Wax Type
Soy, paraffin, coconut, gel, or beeswax; each type of candle wax has a unique melting point and density. And these variances must be taken into account for choosing a candle wick. Reading the recommended wax type for use with a candle wick directly from the manufacturer is a good place to start. They are typically helpful and very accurate, as they have tested extensively.
2nd: Fragrance Load and Color
The second step is a quick consideration of the amount of fragrance or color you plan to add to the candle. The more color or fragrance you include, the thicker you’ll want your wick to be. Because, remember, too much fragrance can cause a candle not to stay lit!
3rd: Candle Type and Size
The third step is to take note of the type of candle you will be making. (I cover candle wax recommendations for just about every type of candle here.) Record measurements for the height and diameter of the candle.
Now use everything you’ve recorded in this checklist with a corresponding candle wick size chart –
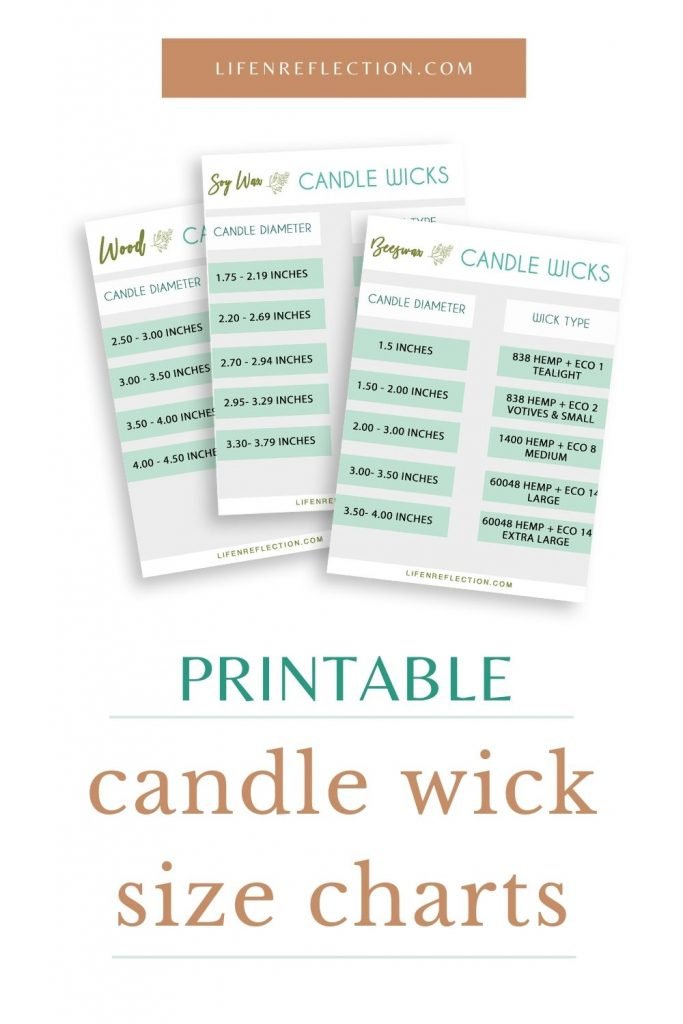
Choosing the correct candle wick is much easier by using a candle wick size chart! Find printable candle wick size charts in the Simple Living Library.
Now you know a lot is weighing on the choice of a candle wick! See our complete candle wick guide for more tips to make candles that burn optimally and have a great scent throw without unnecessary toxins. Because what you make matters!
If you are new to candle-making, start with small candles, in the beginning to save money and familiarize yourself with the process of candle-making through trial and error. Here are a few of my favorite small candles I’ve made:
How To Make Tea Light Candles
You’ll be surprised how little you need to make tea light candles! It is undoubtedly easy and inexpensive to make this DIY twist on an ordinary home decor staple in only four steps.

Easy Soy Wax Floating Candles
It’s easier than you think to make floating candles float on water.
And their small size makes them highly affordable to create – I made six candles with less than a pound of soy wax.
And you can have all the fun when you add color or fragrance for the holidays or a party theme to create candle centerpieces with floating candles!
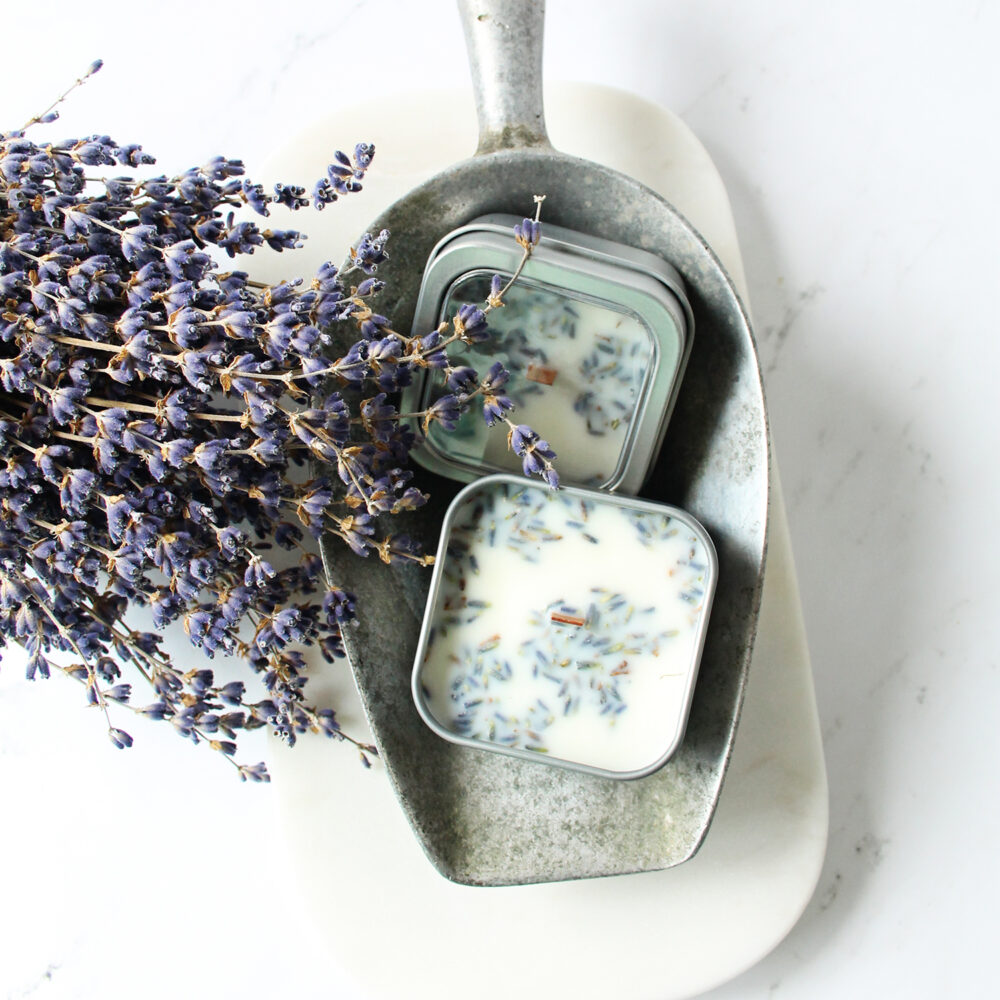
Lavender Travel Candle Tins
You’ll never leave home without a travel candle after you’ve tried one of these DIY lavender travel candle tins! Because dried lavender doesn’t travel well, I found a way to take it with me in a hand-poured lavender travel candle. Lighting one helps you wash away the stress of traveling.
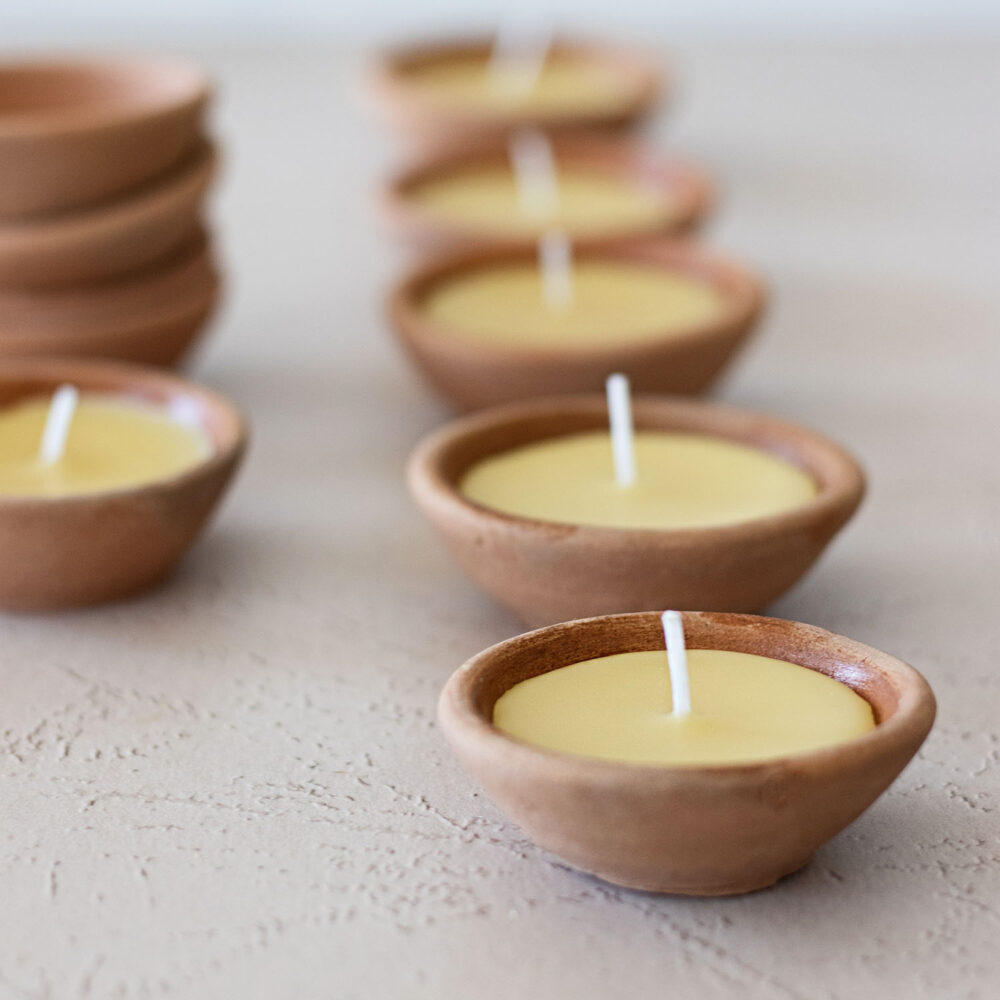
DIY Terracotta Candles
You’ll agree these DIY terracotta candles are simple and incredibly cheaper to make than container candles. Hand-poured beeswax into rustic terracotta candle pots has all the charm of bohemian style. A sublime pairing of natural textures and colors defines the carefree vibe of relaxed, boho style – perfect for entertaining all year, indoors or out. Maybe that’s why I’m obsessed with making these!
Pin these five signs your candle wick size isn’t right and how to choose the proper candle wick. Don’t forget the free printable candle wick size charts! And tag #lifenreflection on Instagram to share your candle-making with me.