How to Make Floating Candles with Soy Wax
How to make floating candles at home with soy wax. Learn what to make floating candles in so they float on water.
I’ve been making container candles for years, and I love discovering new and unique containers to make candles in. And I find blending candle fragrances and adding color to candles is fun.
But this year, I decided to learn how to make other types of candles. I started with tea lights, then moved to votive candles, and now I am ready to show how to make floating candles!
Not to point fingers, but almost every DIY floating candle pin or post I’ve come across doesn’t exactly tell you how to make floating candles. Instead, they just tell you where to buy cheap floating candles and how to decorate with them.
Well, guess what – if you’ve been searching for how to make floating candles, you can stop here. I hand-poured these floating candles, and now you can too!
This post contains some affiliate links for your convenience; read the full disclosure policy.
What can you make floating candles in?
I’ve seen a few ideas out there, such as ice cube molds and bath bomb molds, that I don’t think would be practical to make floating candles in. I bought a candle mold specifically to make floating candles, but even that proved impractical too. It only made a single floating candle and required a putty-type sealant around the wick and seal of the mold.
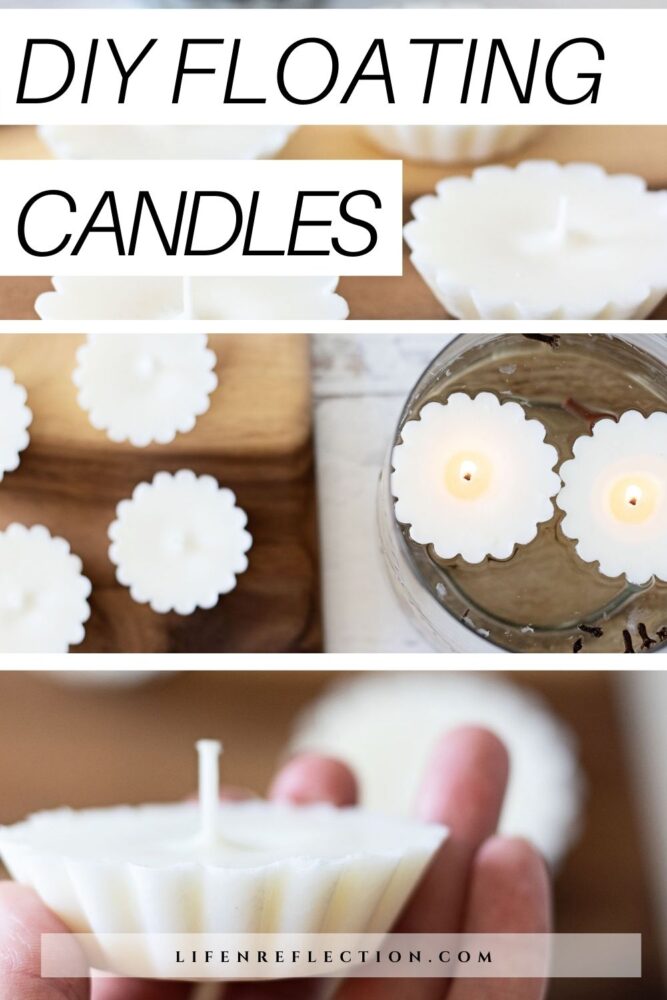
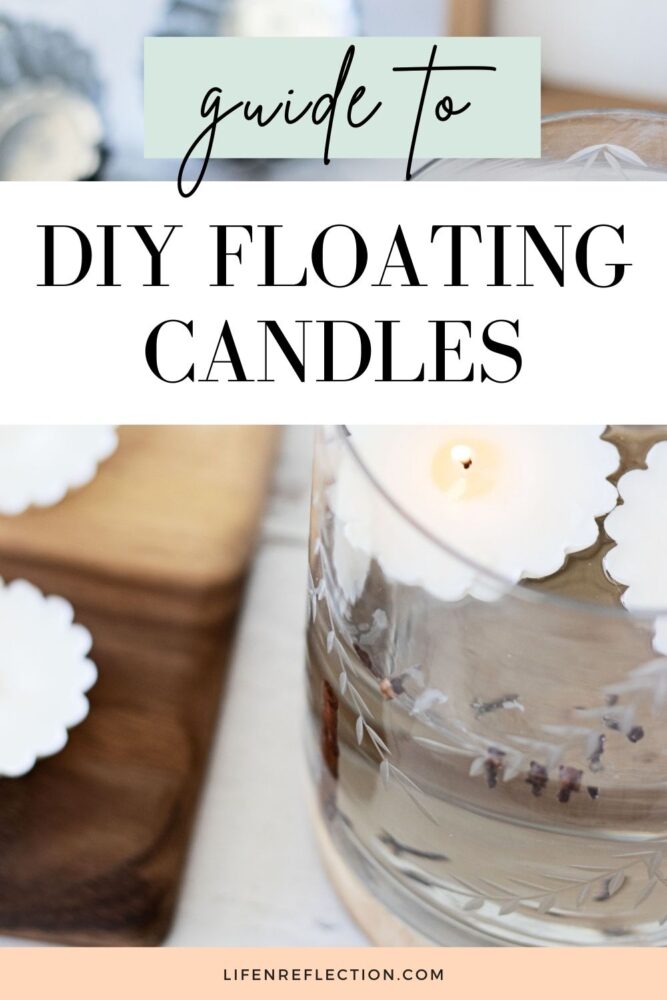
So, as they say, I went back to the drawing board and came up with the idea to use tart tins I had previously used to make this jasmine soap. Happily, they worked well to make floating candles!
The candles popped right out with a firm squeeze after curing. And I didn’t have any trouble with the wicks or needed any sealant to use the tart tins.
Each tart tin holds two ounces of fluid. After adding candle wicks, you truly don’t need much wax either! A win, win for sure!!
Oh, and they float. From what I gather, having a smaller base compared to the top helps candles float really well.
Related To: Candles Containers to Avoid and Those to Use

What wax is used for floating candles?
Like tea lights, most floating candles are made with cheap paraffin wax that isn’t the healthiest to burn in your home. So, what wax do you use to make floating candles? I use soy wax to make floating candles. It works just as well and doesn’t come with any setbacks.

Get a fact sheet on soy wax and more candle-making resources from the Simple Living Library.
Related To: Candle Wax Types
How do you make a floating candle?
When you start with the basics of DIY floating candles, they are extremely affordable to make – I made six candles with less than a pound of soy wax!
You can add color or fragrance to these to customize them for the holidays or a party theme. I’ve got a few ideas for you below to create candle centerpieces with floating candles.

DIY Floating Candle Supplies:

0.60 pounds of soy wax flakes
6 3.5 inch cotton wicks (pre-tabbed)
6 glue dots
How to Make Floating Candles:
Before you begin, you may want to line your work area with parchment paper to catch any drips or overpours.
1. Prepare your tart tins for candles by pressing the metal tab of a candle wick into a glue dot while still on the roll. Carefully pull the wick and glue dot from the roll and place it into the center base of one tart tin. (Trust me, it’s easier this way.) Repeat until you have prepped all six tins.
Note: I don’t recommend using a wick sticker tab for these as they will take up room in the small tins and might be harder to remove after the candles cure. The glue dots are teeny tiny, and have more of a temporary hold.
2. Next, use a kitchen scale to measure .60 pounds of soy wax flakes. Pour the wax into a candle melting pitcher and place it inside a saucepan filled with about 2 inches of water. Use the double boiler method to heat on low heat with a gentle simmer at most.
3. Stir slowly yet often, and remove the pitcher from the heat immediately after melting. The best temperature to pour soy wax is 130°F and 140°F. Check it with a quick infrared thermometer or a candle thermometer. Carefully pour the wax into each tart tin. Then allow the wax to cool and harden for several hours before popping them out.
Now For The Fun Part – Floating Candle Centerpieces
Create floating candle centerpieces to welcome guests, decorate the table, or enjoy in the bedroom or bathroom. Start by adding decorative items to the container you’ll use to make the floating candle display.
Things to Add to Floating Candles:
– fresh flowers
– seashells
– whole spices
– sand
– moss balls
– smooth river stones
– dried or fresh herbs
– crystals
– berries
– lemons sliced or whole
– evergreen sprigs
Next, pour water into the container until it’s half to a third full. Then gently place 1 to three candles on the top of the water. I think they look best when they float around, so don’t add too many to one container.
Make sure none of your decorations in the container will be able to reach the candle flames. Then use a long candle match or bendable candle lighter to light each floating candle and enjoy!

How to Make Floating Candles
Here’s how to make floating candles with soy wax at home.
Materials
- 0.60 pounds of soy wax flakes
- 6 3.5 inch cotton wicks (pre-tabbed)
- 6 glue dots
Tools
- 6 tart tins
- kitchen scale
- candle melting pitcher
- candle thermometer
Instructions
- Prepare your tart tins for candles by pressing the metal tab of a candle wick into a glue dot while still on the roll. Carefully pull the wick and glue dot from the roll and place it into the center base of one tart tin. (Trust me, it’s easier this way.) Repeat until you have prepped all six tins.
- Note: I don’t recommend using a wick sticker tab for these as they will take up room in the small tins and might be harder to remove after the candles cure. The glue dots are teeny tiny, and have more of a temporary hold.
- Next, use a kitchen scale to measure .60 pounds of soy wax flakes. Pour the wax into a candle melting pitcher and place it inside a saucepan filled with about 2 inches of water. Use the double boiler method to heat on low heat with a gentle simmer at most.
- Stir slowly yet often, and remove the pitcher from the heat immediately after melting. The best temperature to pour soy wax is 130°F and 140°F. Check it with a quick infrared thermometer or a candle thermometer. Carefully pour the wax into each tart tin. Then, allow the wax to cool and harden for several hours before popping them out.
Notes
Before you begin, you may want to line your work area with parchment paper to catch any drips or over pours.
Recommended Products
As an Amazon Associate and member of other affiliate programs, I earn from qualifying purchases.


As you can see, floating candle centerpieces are very customizable. But the best part is that they only take a few supplies to make and will last longer than tea lights.
YOU MAY ALSO LIKE:
- Flodesk Studio: First Look
- Wood Cutting Board Care
- Sun-Soaked Garden Beeswax Candles
- Lemon Cedar Dust Spray and Polish
- Lemon Poppy Seed Melt and Pour Soap Recipe

Pin these steps for how to make floating candles at home now! Tag #lifenreflection on Instagram to share your candle making with me.
Hi! loved your article. Do you have any tips for getting a 4hr or more burn time?
Thanks Kris! Candles are really meant to be burned for more than four hours at a time. Take a look at your candle care guide for ways to make candles last longer.
Do you have to put them in the freezer to pop them out?
Yes, that does work. If you opt for a silicone mold they’ll pop out much easier.